Go from purchase to running CRM. No coding required.
About 45 minutes of your time, spread across two sessions.
What you'll need
Your MaxAct purchase confirmation email
An email address for creating accounts
A credit card for Anthropic (Claude) and Vercel Pro
A note or doc to paste your credentials (passwords, tokens, keys, etc.)
How this works: You'll create three accounts and collect credentials in Steps 1-3. In Step 4, you send those credentials to MaxAct. MaxAct deploys your CRM and emails you login info. Then you finish setup in Steps 5-9.
Phase 1: Collect Credentials
Step 1: Create Your Accounts
~10 min
You'll create three accounts. You will own all three — MaxAct does not have access to them.
Create a Supabase account & set up your database
Supabase is where your CRM data is stored (your database).
1
Go to supabase.com and click "Start your project", then click "Sign Up" at the bottom of the page
2
Click "Continue with email". Enter your email, create a password, and confirm via the link sent to your inbox.
3
Create an organization: click "New organization", enter your company name, select "Personal" and "Free", and click "Create organization"
4
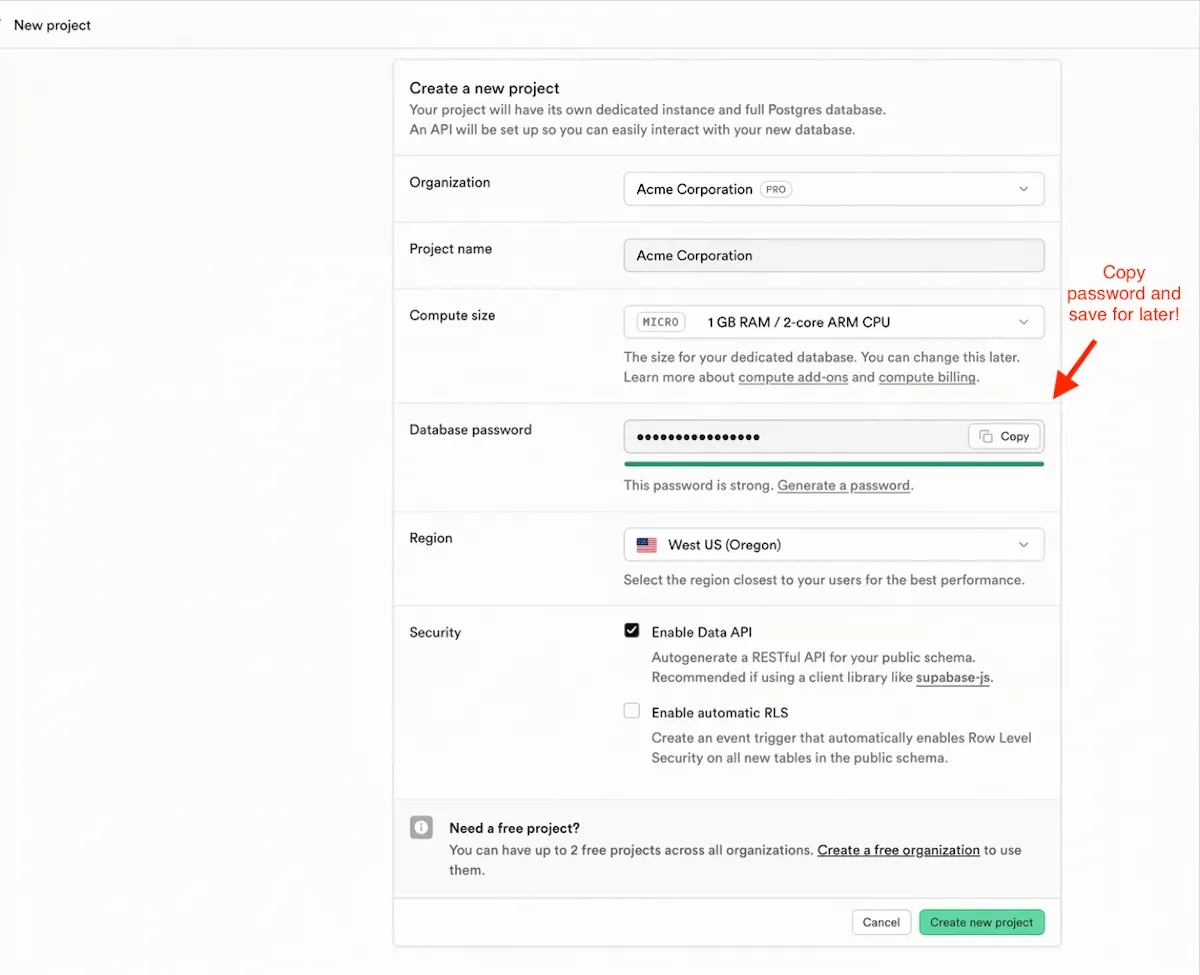
This takes you right into creating a project. Fill in:
Project Name: companyname-crm (e.g., acme-crm)
Database Password: Click "Generate a password", copy password, and save for later
Region: Select the region closest to your team
Save your database password now! Copy it somewhere safe. You'll need it when you send credentials to MaxAct in Step 4.
5
Click "Create new project" and wait 1-2 minutes for it to finish
Configure email login
1
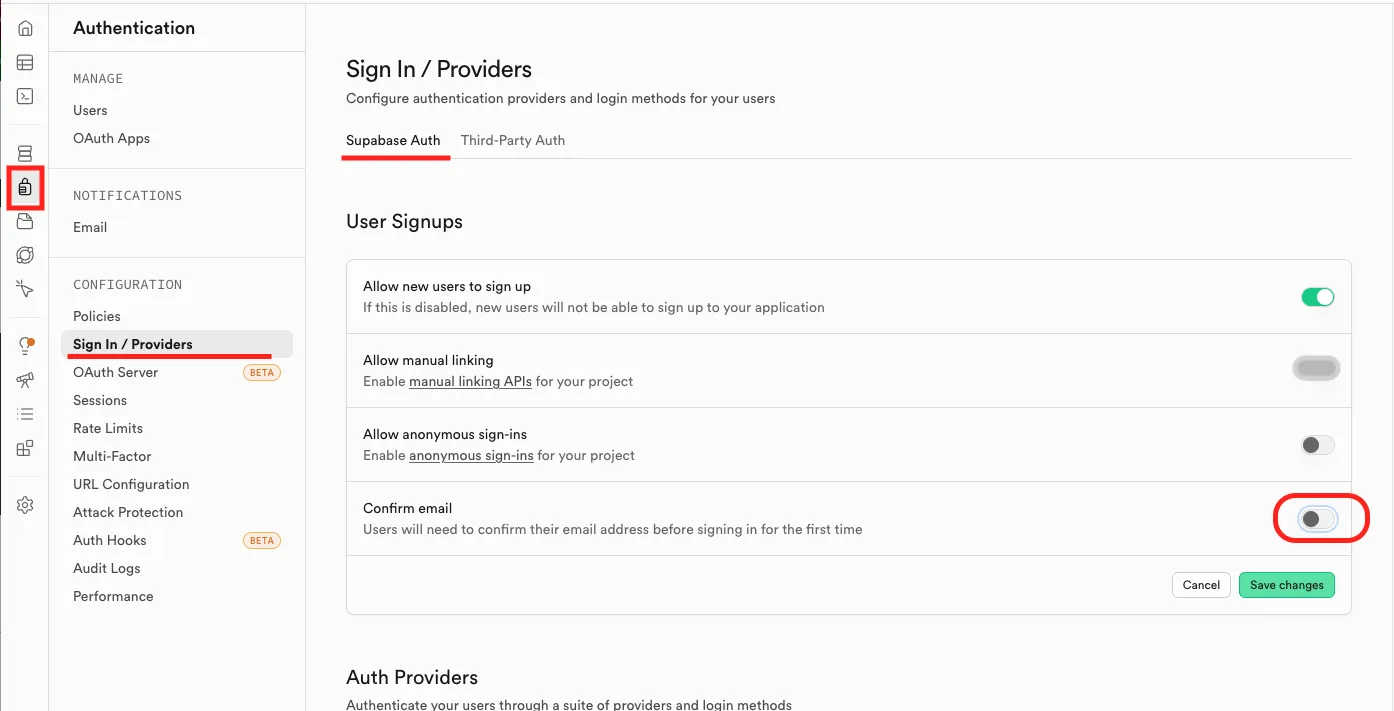
In the left sidebar, click "Authentication"
2
Click "Sign In / Providers" in the submenu
3
Toggle "Confirm email" to OFF
4
Click "Save"
Copy your database credentials
1
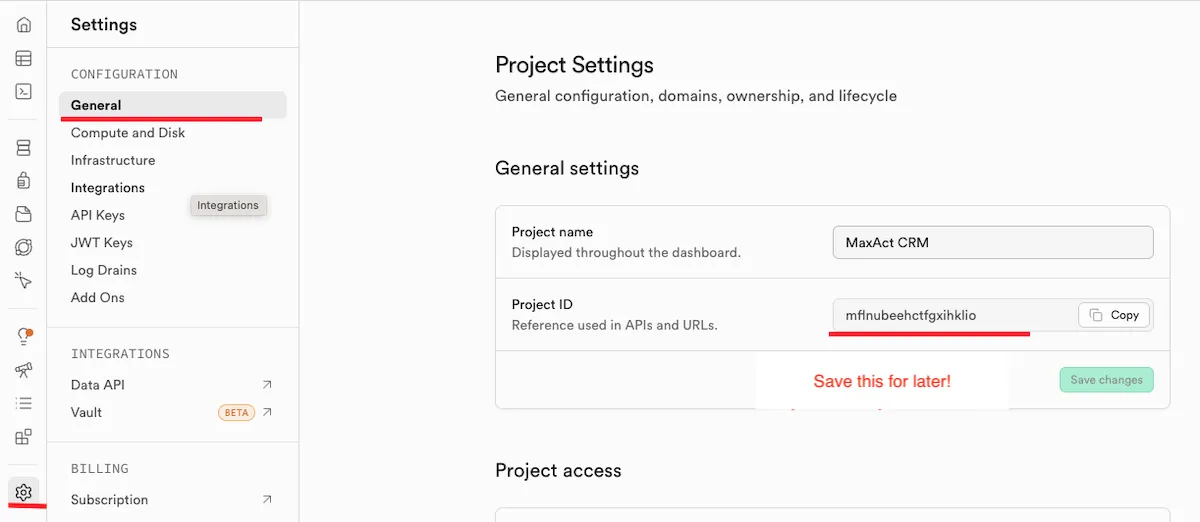
Click "Settings" in the left sidebar (gear icon at bottom)
2
Click "General" in the left submenu and copy your Project ID:
Project ID
Next to "Project ID" there is a text string — this is your Supabase Project ID
Supabase Project ID
3
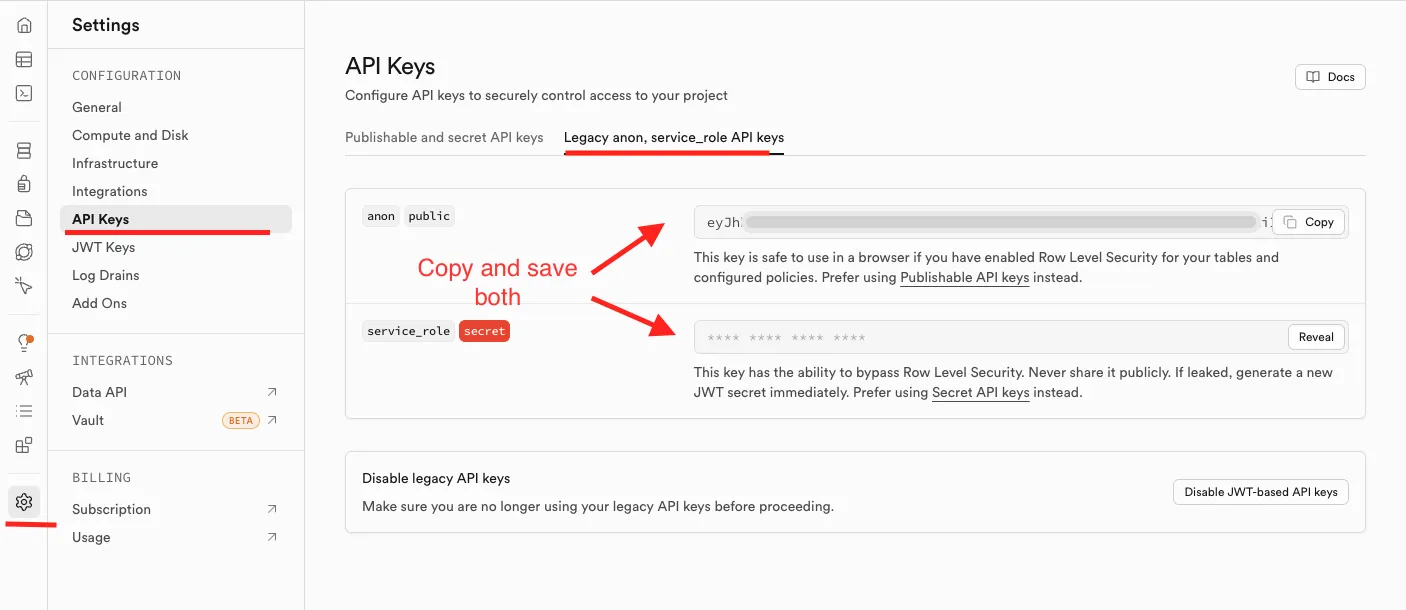
Click "API Keys" in the left submenu, then click "Legacy" to reveal the anon and service_role keys. Copy these two keys:
anon / public key
The row labeled "anon" / "public"
Supabase Anon Key
service_role / secret key
Click "Reveal" first, then copy
Supabase Service Role Key
Keep the service_role key secret. It has full database access. You'll send it securely to MaxAct in Step 4 — do not share it publicly or post it online.
4
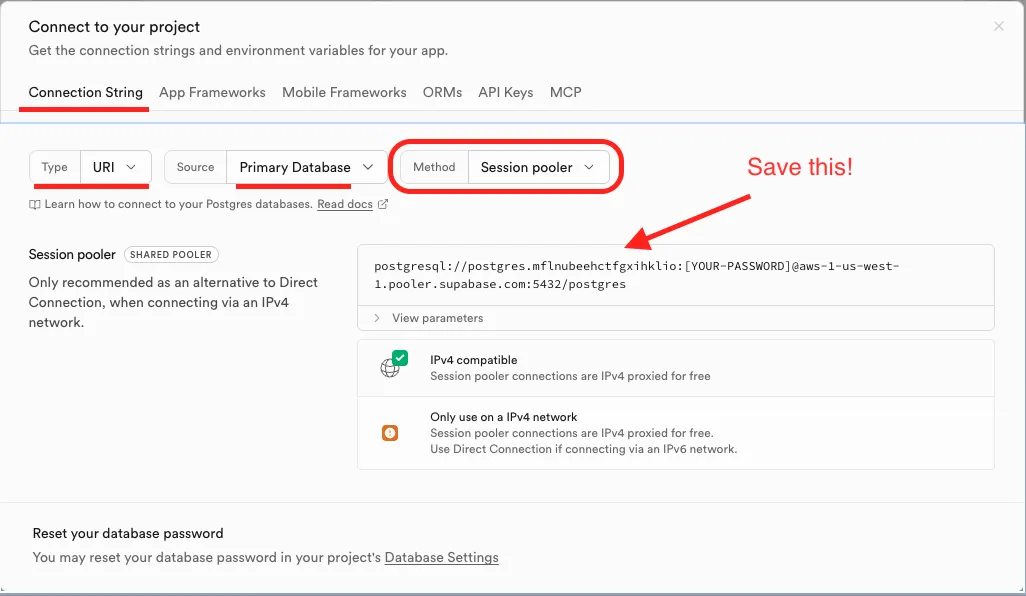
Click the "Connect" button at the top of the page (in the top navigation bar)
5
Find the "Session Pooler" connection string in URI format and copy it:
Connection String (Session Pooler)
Under "Session Pooler" — URI format, looks like postgresql://postgres.abcdefghij:...@aws-0-us-east-1.pooler.supabase.com:5432/postgres
Connection String
Note: The connection string contains [YOUR-PASSWORD] as a placeholder — MaxAct will replace it with the database password you saved earlier.
Database tables: MaxAct will set up your database tables automatically when they deploy your CRM. You don't need to run any SQL.
Create an Anthropic account
Anthropic provides the AI (Claude) that powers MaxAct.
1
Go to console.anthropic.com and sign in with Google or email
Buy a small amount of credits for now. You will return here to manage additional credits in the future.
4
If it prompts you to create an API Key, skip for now but keep the tab open during setup.
Create a Vercel account & upgrade to Pro
Vercel is where your CRM application runs (your web hosting).
1
Go to vercel.com and click "Sign Up". Choose "Continue with Email".
2
If asked during setup, select the Pro Plan
3
Save your team name and project name
4
Click the icon in the upper right and click "Upgrade to Pro" — it will take you to a page where you enter your credit card info
Why Pro? MaxAct uses scheduled tasks (email syncing) and longer-running AI operations that require the Pro plan. The free Hobby plan does not support these features.
Step 2: Get Your AI Key
~3 min
Generate an API key — you'll enter it in MaxAct during the setup wizard.
Create an Anthropic API key
1
Go to console.anthropic.com and log in
2
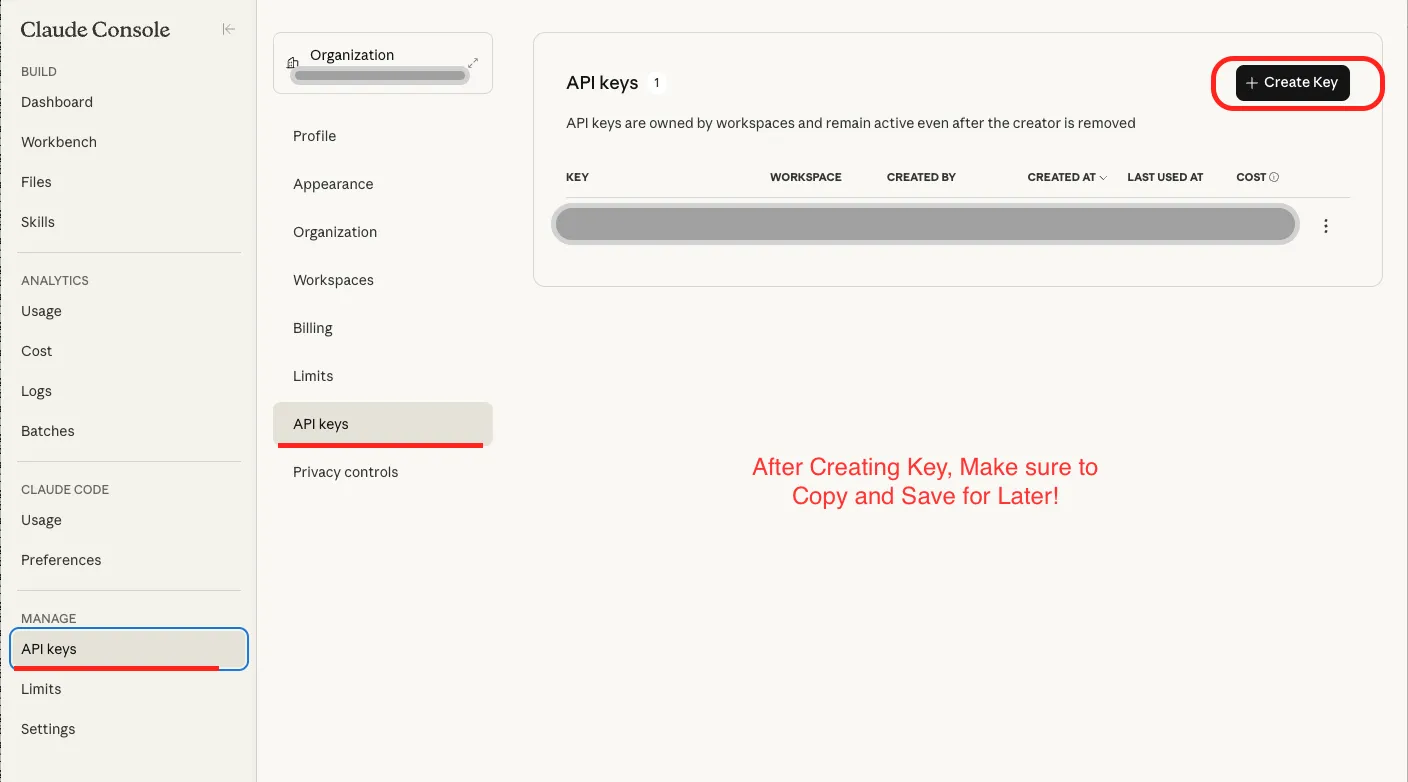
Click "API keys" in the left sidebar
3
Click "Create Key", name it maxact-crm, then click "Add" — the key will be revealed
4
Copy the key (starts with sk-ant-...) and save it. Label: Anthropic API Key
Copy it now! The key is shown only once. If you lose it, you'll need to create a new one.
Don't include this in your email to MaxAct. You'll enter this key yourself during the setup wizard (Step 7). It never needs to be shared.
Step 3: Get Your Hosting Token
~3 min
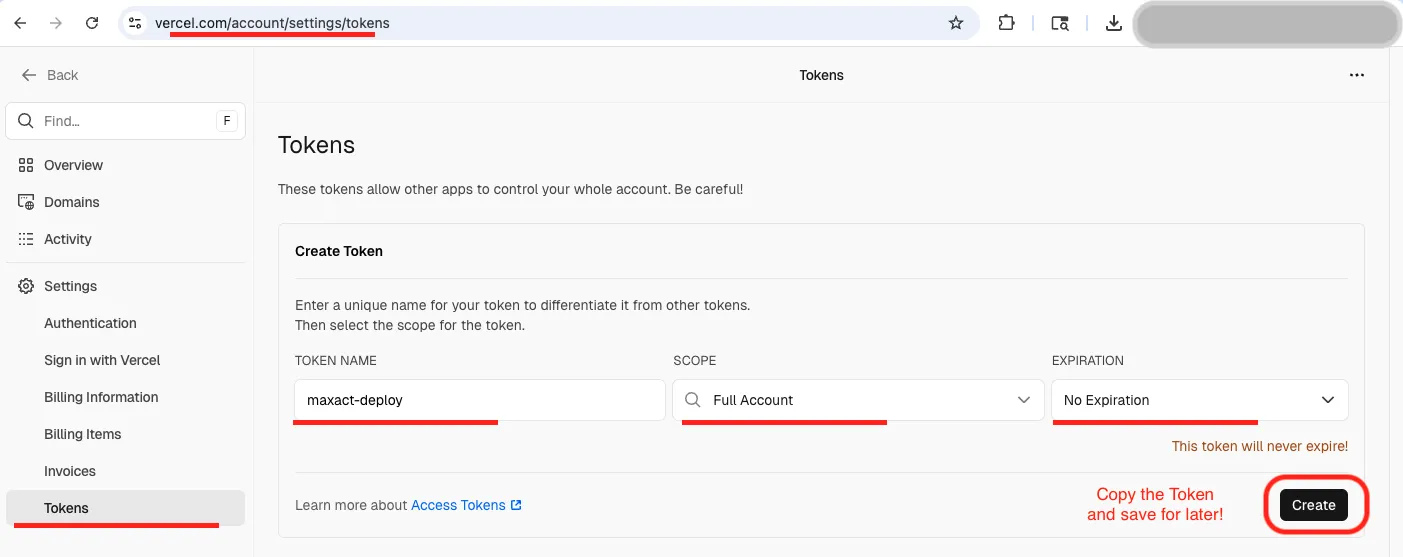
Create a Vercel API token so MaxAct can deploy your CRM and push updates to your account.
Is this safe? This token lets MaxAct deploy the CRM app and push code updates to your account. It cannot access your billing, change your password, or delete your account.
Step 4: Send Your Credentials to MaxAct
~2 min
Send all the credentials you've collected to MaxAct so they can deploy your CRM.
Don't include your Anthropic API key. You'll enter it yourself during the setup wizard (Step 7).
Security: These credentials only give access to the specific services you created. MaxAct uses them solely to configure and deploy your CRM. After deployment, the credentials are stored securely in your Vercel project's environment variables.
Waiting on MaxAct
MaxAct will now deploy your CRM. You'll receive an email with:
Your CRM URL (e.g., your-company.vercel.app)
Your login credentials (email + temporary password)
A note that your 30-day trial has started
This usually takes less than 1 business day.
Once you receive the email, continue to Step 5 below.
Phase 2: Set Up Your CRM
Step 5: Verify Your Deployment
~2 min
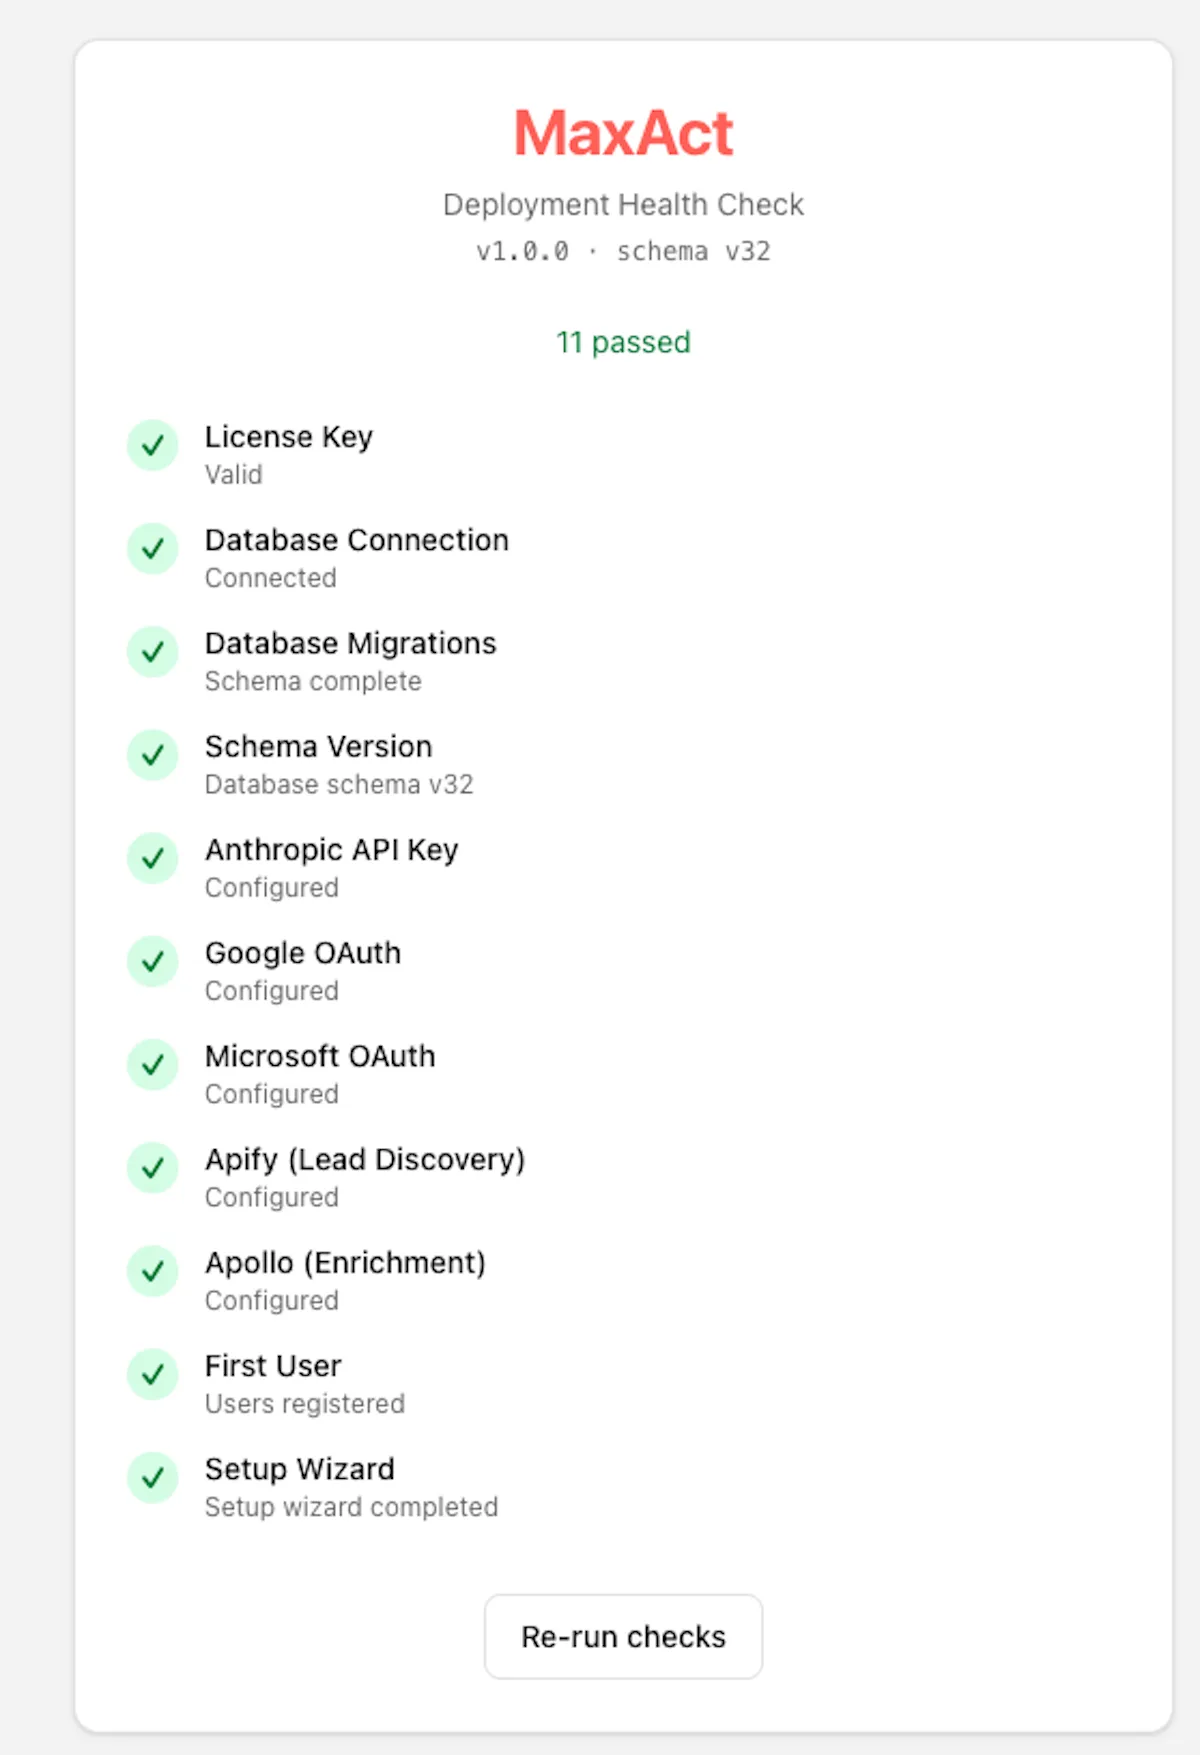
Confirm that all systems are connected before doing anything else.
Run the health check
1
Open your CRM URL (from MaxAct's email) and add /setup/verify to the end
2
Check for green checkmarks next to: License, Database, Migrations, and Anthropic
3
Yellow items (Google, Apify, Apollo) are optional — that's fine for now
4
If anything shows red, the page will show specific fix instructions. Contact support@maxact.ai if you need help
Step 6: Log In & Change Your Password
~2 min
MaxAct created your first admin account. Log in and set your own password.
Sign in and update your password
1
Go to your CRM URL (e.g., your-company.vercel.app). You'll see the login page.
2
Enter the email and temporary password from MaxAct's email
3
Go to Settings > Personal and click "Update Password" to set your own
As the first user, you're automatically the manager (admin). You have full access to settings, reports, and team management.
Step 7: Complete the Setup Wizard
~10 min
The setup wizard teaches the AI about your business so it can help your reps effectively.
Fill out the setup wizard
1
Company Name: Enter your company name
2
Industry: Enter your industry (e.g., "Food & Beverage Distribution")
3
AI Configuration: Enter your Anthropic API key (from Step 2). Click "Test Key" to verify it works. You can skip this and configure it later in Settings > API Management, but the AI chat won't work until a key is provided.
4
Product Description: Describe what you sell. Be specific — include product names, prices, and who you sell to. The AI uses this to help your reps.
5
Knowledge Base: Add entries about your products, pricing, competitors, and common objections. Start with at least 2-3 entries — you can add more later.
6
Pipeline Stages: The defaults (New, Contacted, Quote, Won, Lost) work for most businesses. Customize if needed.
7
Click "Complete Setup"
Don't worry about perfection. You can update all of this later from Settings > Knowledge. Start with the basics and refine over time.
Step 8: Test the AI
~2 min
Make sure everything is working by testing the AI chat.
Send a test message
1
After setup, you'll land on the main chat page. Type: Add a test lead called Acme Test Corp in Portland, Oregon
2
The AI should respond and create a new lead in your CRM
3
Try another: Show me my pipeline
4
Click "Dashboard" in the top navigation to see the visual pipeline board with your test lead
Step 9: Invite Your Team
~5 min
Add your sales reps so they can start using the CRM.
Create accounts for your team
1
In the AI chat, type: Create an account for john@yourcompany.com with password TempPass123
2
The AI creates the account immediately. The person can log in right away.
3
For managers (full admin access), add "as a manager": Create an account for jane@yourcompany.com with password TempPass456 as a manager
4
Share the credentials with each person securely. They can change their password in Settings > Personal.
Roles explained:
Manager — full access to all leads, settings, team management, and reports
Rep — can see their assigned leads, log activities, and use the AI chat
Viewer — read-only access to pipeline and reports
No seat limits — your MaxAct license covers unlimited users.
Optional Integrations
Your CRM is fully functional without these. Set them up whenever you're ready.
Connect your own domain (e.g., crm.yourcompany.com) instead of using the default Vercel URL. You can skip this and come back later.
1
Add your domain to Vercel
Log into vercel.com, click your project, go to Settings > Domains, type your subdomain (e.g., crm.yourcompany.com), and click "Add". Vercel will show you DNS configuration info (CNAME record).
2
Add a DNS record at your domain registrar
Go to your domain registrar (GoDaddy, Namecheap, Cloudflare, etc.) and add a CNAME record:
Type: CNAME
Name:crm (just the subdomain part)
Value:cname.vercel-dns.com
3
Wait for the DNS to update
Wait 5-15 minutes (sometimes up to 1 hour). Go back to Vercel Domains — you should see a green checkmark and "Valid Configuration".
4
Update your app URL in MaxAct
Log into MaxAct as a manager > Settings > scroll to API Management > find the App URL field. Enter your custom domain (e.g., https://crm.yourcompany.com) and click "Save". No redeployment needed. This ensures OAuth redirects and integrations use the correct address.
5
Update Supabase auth URLs
Go to your Supabase project > Authentication > URL Configuration:
Update "Site URL" to your new domain (e.g., https://crm.yourcompany.com)
Under "Redirect URLs", click "Add URL" and enter: https://crm.yourcompany.com/api/auth/callback
Lets reps send emails and create calendar events directly from the AI chat. This is a more technical setup — take your time.
Part A: Create Google Cloud OAuth credentials
1
Go to console.cloud.google.com, create a new project named maxact-crm
2
Enable APIs: Search for and enable "Gmail API" and "Google Calendar API"
3
OAuth consent screen: Go to APIs & Services > OAuth consent screen. Select "External", fill in your app name and email, then add these scopes:
https://www.googleapis.com/auth/gmail.readonly
https://www.googleapis.com/auth/gmail.send
https://www.googleapis.com/auth/calendar
https://www.googleapis.com/auth/userinfo.email
Add your email as a test user, then save.
4
Create OAuth client ID: Go to APIs & Services > Credentials > Create Credentials > OAuth client ID. Set type to "Web application", name it "MaxAct CRM", and add this redirect URI: https://YOUR-CRM-URL/api/google/callback
5
Copy the Client ID and Client Secret and save them
Part B: Configure Supabase
1
In your Supabase project, go to Authentication > Sign In / Providers > Google
2
Toggle "Enable Google provider" to ON
3
Paste your Client ID and Client Secret, then click "Save"
Part C: Add credentials to MaxAct
Log into MaxAct as a manager > Settings > scroll to API Management > under Email & Calendar, enter your Google Client ID and Google Client Secret. Click "Save". No redeployment needed — changes take effect immediately.
Part D: Connect Google (each team member)
Each team member who wants Gmail/Calendar integration should: log into MaxAct > Settings > Personal > scroll to Google > click "Connect Google Account" > sign in with their work Gmail and click "Allow".
While your Google Cloud app is in "Testing" mode, only test users you added can connect. To roll out to your full team, either add all team members as test users or publish the app in Google Cloud Console.
Lets reps send emails and create calendar events through Outlook directly from the AI chat.
Part A: Register an Azure app
1
Go to portal.azure.com and search for "App registrations"
2
Click "+ New registration". Name it MaxAct CRM. Under "Supported account types", select "Accounts in any organizational directory and personal Microsoft accounts". Set redirect URI to Web: https://YOUR-CRM-URL/api/microsoft/callback
3
Copy the Application (client) ID from the Overview page. Save as MICROSOFT_CLIENT_ID
4
Go to Certificates & secrets > "+ New client secret". Name it maxact-crm, set expiry to 24 months. Immediately copy the Value (not the Secret ID). Save as MICROSOFT_CLIENT_SECRET
5
Go to API permissions > "+ Add a permission" > Microsoft Graph > Delegated. Add: Mail.Read, Mail.Send, Calendars.ReadWrite, User.Read, offline_access
Part B: Configure Supabase
1
In Supabase, go to Authentication > Sign In / Providers > Azure (Microsoft)
2
Toggle "Enable Azure provider" to ON
3
Paste your Client ID and Client Secret. Set Azure Tenant URL to https://login.microsoftonline.com/common
4
Click "Save"
Part C: Add credentials to MaxAct
Log into MaxAct as a manager > Settings > scroll to API Management > under Email & Calendar, enter your Microsoft Client ID and Microsoft Client Secret. Leave Microsoft Tenant ID blank to allow all account types, or enter your specific tenant ID to restrict to your organization. Click "Save". No redeployment needed — changes take effect immediately.
Part D: Connect Microsoft (each team member)
Each team member should: log into MaxAct > Settings > Personal > scroll to Microsoft > click "Connect Microsoft Account" > sign in with their work/personal Outlook and click "Accept".
Apify lets the AI search for real businesses in your target area. Without it, lead discovery features use demo data.
1
Go to apify.com and create an account (free tier available, paid plans ~$49/month)
2
Go to your avatar > Settings > Integrations. Under "Personal API tokens", click "+ Add token", name it maxact, and copy it
3
In MaxAct, go to Settings > API Management. Find the Apify API Token field. Paste your token and click "Test" to verify it works. Click "Save". No redeployment needed.
Apollo lets the AI look up phone numbers, email addresses, and company data for your leads.
1
Go to apollo.io and create an account (free tier available, paid plans ~$49/month)
2
Go to Settings > Integrations > API. Copy your API key.
3
In MaxAct, go to Settings > API Management. Find the Apollo API Key field. Paste your key and click "Test" to verify it works. Click "Save". No redeployment needed.
Automatically logs phone calls against the right leads. Supports OpenPhone, Aircall, and any webhook-compatible dialer.
1
In your CRM, go to Settings (Organization Settings) and scroll to Phone Integration
2
Select your provider (OpenPhone, Aircall, or Generic Webhook) and click "Save"
3
A Webhook URL will appear. Copy it.
4
Go to your phone provider's settings and paste the webhook URL:
Other: Find Webhooks/Integrations in your provider, paste URL, enable call completion events
Calls are automatically matched to leads by phone number and logged as activities. No manual entry required.
Updates & Maintenance
Keeping Your CRM Up to Date
MaxAct releases free updates with bug fixes and new features. Updates are opt-in — your CRM stays on its current version until you request an update.
Check for updates
Log in as a manager > Settings > Updates. You'll see your current version and whether an update is available.
Request an app update
If an update is available, click "Request Update". This sends an email to MaxAct. They'll deploy the update — usually within 1 business day — and email you when it's live.
Apply database updates
After an app update, if a database update is needed, you'll see a yellow card on Settings > Updates. Click "Apply Database Updates" and wait for the success message.
Adding or Updating Environment Variables in Vercel
Some optional integrations and configuration changes (like custom domains) require adding environment variables to your Vercel project. You can do this yourself without contacting MaxAct.
1
Log into vercel.com and click on your MaxAct project
2
Go to Settings > "Environment Variables" in the left sidebar
3
To add a new variable: enter the name (e.g., GOOGLE_CLIENT_ID) and value, make sure Production, Preview, and Development are all checked, then click "Save"
4
To update an existing variable: find it in the list, click the three-dot menu > "Edit", change the value, and click "Save"
5
Redeploy to apply changes: go to the "Deployments" tab, find the latest deployment, click the three-dot menu > "Redeploy", and confirm
Changes won't take effect until you redeploy. After adding or updating any environment variable, you must redeploy for the change to go live.
When to use this: Most integration credentials (Anthropic, Google, Microsoft, Apify, Apollo) are now configured directly in Settings > API Management without touching Vercel. This Vercel process is mainly needed for advanced cases or if directed by MaxAct support. You can always email support@maxact.ai if you need help.
Troubleshooting
The license key environment variable is missing or invalid. Contact support@maxact.ai — they can verify and fix the license key on your Vercel project.
Your trial license has expired. Contact support@maxact.ai to activate your permanent license or extend the trial.
Check that your Supabase project is active (free tier projects pause after 1 week of inactivity). If paused, click "Restore project" in Supabase. Also verify your Supabase URL and service role key match what's shown in Supabase Settings > API.
Redirect URLs don't match. Check three places:
Supabase > Authentication > URL Configuration: Site URL and redirect URL must match your CRM domain
Google Cloud or Azure Portal: redirect URI must exactly match https://YOUR-DOMAIN/api/google/callback (or /api/microsoft/callback)
Contact MaxAct to verify NEXT_PUBLIC_APP_URL is set correctly
Check Settings > API Management in your CRM — make sure the Anthropic API Key shows a green status. If not configured, enter your key and click "Test". If the key was revoked, create a new one at console.anthropic.com and update it in Settings > API Management. Also check that your Anthropic account has a payment method with available credits.
The team member's email wasn't added yet. Log in as a manager and create their account in the AI chat: Create an account for their@email.com with password TempPass123. Or, if using Google/Microsoft OAuth: Invite their@email.com as a rep.
Log in as a manager and type in the AI chat: Reset password for their@email.com to TempPass123. Share the new credentials securely. They can set their own password in Settings > Personal.
🎉
You're all set!
Your MaxAct CRM is deployed and ready. Here's what to explore next:
Import leads: Use the paperclip icon in chat to upload a CSV of existing leads
Find prospects: Ask the AI to run a lead discovery search in your target area
Explore reports: Click Dashboard for pipeline, activity, and goal tracking
Connect email: Set up Google or Microsoft integration (see Optional sections above)
Log calls: Connect your phone system (see Optional sections above)
Learn more: Check the built-in Knowledge Base (once logged in) for guides on every feature